
参考文献:三个案例带你看懂LayoutInflater中inflate方法两个参数和三个参数的区别
1. 三个参数的 inflate 方法
public View inflate(@LayoutRes int resource, @Nullable ViewGroup root, boolean attachToRoot)
1.1 root 不为 null,attachToRoot 为 true
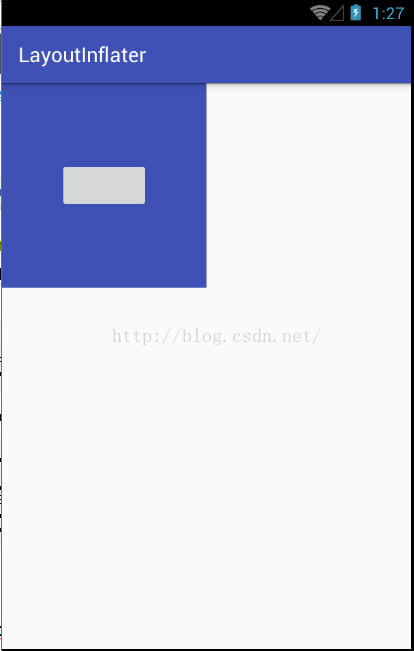
当 root 不为 null,attachToRoot 为 true 时,表示将 resource 指定的布局添加到 root 中,添加的过程中 resource 所指定的的布局的根节点的各个属性都是有效的。比如下面一个案例,我的 Activity 的布局如下:
<?xml version="1.0" encoding="utf-8"?>
<LinearLayout xmlns:android="http://schemas.android.com/apk/res/android"
    xmlns:tools="http://schemas.android.com/tools"
    android:layout_width="match_parent"
    android:layout_height="match_parent"
    android:orientation="vertical"
    android:id="@+id/ll1"
    tools:context="org.sang.layoutinflater.MainActivity">
</LinearLayout>
我还有一个布局 linearlayout.xml 如下:
<?xml version="1.0" encoding="utf-8"?>
<LinearLayout xmlns:android="http://schemas.android.com/apk/res/android"
    android:id="@+id/ll2"
    android:layout_width="200dp"
    android:layout_height="200dp"
    android:background="@color/colorPrimary"
    android:gravity="center"
    android:orientation="vertical">

    <Button
        android:layout_width="wrap_content"
        android:layout_height="wrap_content" />
</LinearLayout>
我现在想把这个 linearlayout.xml 布局文件添加到我的 activity 的布局中,那么我可以这么做:
@Override
protected void onCreate(Bundle savedInstanceState) {
    super.onCreate(savedInstanceState);
    setContentView(R.layout.activity_main);
    LinearLayout ll1 = (LinearLayout) findViewById(R.id.ll1);
    LayoutInflater inflater = LayoutInflater.from(this);
    inflater.inflate(R.layout.linearlayout, ll1,true);
}
小伙伴们注意到,这里我都没写将 inflate 出来的 View 添加到ll中的代码,但是 linearlayout 布局文件就已经添加进来了,这就是因为我第三个参数设置为了 true,表示将第一个参数所指定的布局添加到第二个参数的 View 中。最终显示效果如下:
若是这样写,则会报错
protected void onCreate(Bundle savedInstanceState) {
    super.onCreate(savedInstanceState);
    setContentView(R.layout.activity_main);
    LinearLayout ll1 = (LinearLayout) findViewById(R.id.ll1);
    LayoutInflater inflater = LayoutInflater.from(this);
    View view = inflater.inflate(R.layout.linearlayout, ll1, true);
    ll1.addView(view);
}
1.2 root 不为 null,attachToRoot 为 false
如果 root 不为 null,而 attachToRoot 为 false 的话,表示不将第一个参数所指定的 View 添加到 root 中,那么这个时候有的小伙伴可能就有疑问了,既然不添加到 root 中,那我还写这么多干嘛?我第二个参数直接给 null 不就可以了?其实不然,这里涉及到另外一个问题:我们在开发的过程中给控件所指定的 layout_width 和 layout_height 到底是什么意思?该属性的表示一个控件在容器中的大小,就是说这个控件必须在容器中,这个属性才有意义,否则无意义。
这就意味着如果我直接将 linearlayout 加载进来而不给它指定一个父布局,则 inflate 布局的根节点的 layout_width 和 layout_height 属性将会失效(因为这个时候 linearlayout 将不处于任何容器中,那么它的根节点的宽高自然会失效)。如果我想让 linearlayout 的根节点有效,又不想让其处于某一个容器中,那我就可以设置 root 不为 null,而 attachToRoot 为 false。这样,指定 root 的目的也就很明确了,即 root 会协助 linearlayout 的根节点生成布局参数,只有这一个作用。OK,还是上面的布局文件,如果我想将之添加到 activity 的布局中又该如何呢?
protected void onCreate(Bundle savedInstanceState) {
    super.onCreate(savedInstanceState);
    setContentView(R.layout.activity_main);
    LinearLayout ll1 = (LinearLayout) findViewById(R.id.ll1);
    LayoutInflater inflater = LayoutInflater.from(this);
    View view = inflater.inflate(R.layout.linearlayout, ll1, false);
    ll1.addView(view);
}
1.3 root 为 null
当 root 为 null 时,不论 attachToRoot 为 true 还是为 false,显示效果都是一样的。当 root 为 null 表示我不需要将第一个参数所指定的布局添加到任何容器中,同时也表示没有任何容器来来协助第一个参数所指定布局的根节点生成布局参数。我还是使用上文提到的 linearlayout,我们来看下面一段代码:
protected void onCreate(Bundle savedInstanceState) {
    super.onCreate(savedInstanceState);
    setContentView(R.layout.activity_main);
    LinearLayout ll1 = (LinearLayout) findViewById(R.id.ll1);
    LayoutInflater inflater = LayoutInflater.from(this);
    View view = inflater.inflate(R.layout.linearlayout, null, false);
    ll1.addView(view);
}
当第二个参数为 null,第三个参数为 false 时(即使为 true 显示效果也是一样的,这里以 false 为例),由于在 inflate 方法中没有将 linearlayout 添加到某一个容器中,所以我需要手动添加,另外由于 linearlayout 并没有处于某一个容器中,所以它的根节点的宽高属性会失效,显示效果如下:
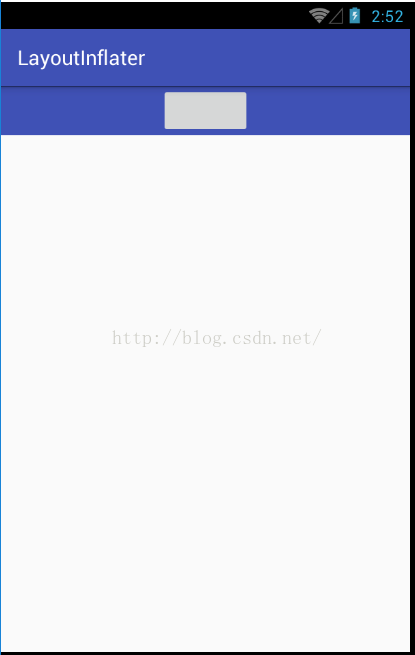
小伙伴们注意,这个时候不管我给 linearlayout 的根节点的宽高设置什么,都是没有效果的,它都是包裹 button,如果我修改 button,则 button 会立即有变化,因为 button 是处于某一个容器中的。
2. 两个参数的 inflate 方法
两个参数的 inflate 方法就很简单了,我们来稍微看一点点源码:
public View inflate(XmlPullParser parser, @Nullable ViewGroup root) {
    return inflate(parser, root, root != null);
}
这是两个参数的 inflate 方法,大家注意两个参数实际上最终也是调用了三个参数。
两个参数的 inflate 方法分为 如下两种情况:
- root 为 null,等同于 1.3 所述情况。
- root 不为 null,等同于 1.1 所述情况。
3. 总结
两个参数的时候,第二个参数 root!=null 时会自动附加。
三个参数时,有 root 时一定要写,才能使宽和高生效,第三个参数表示要不要附加到 root
4. 为什么 Activity 布局的根节点的宽高属性会生效?
其实原因很简单,大部分情况下我们一个 Activity 页面由两部分组成(Android的版本号和应用主题会影响到Activity页面组成,这里以常见页面为例),我们的页面中有一个顶级 View 叫做 DecorView,DecorView 中包含一个竖直方向的 LinearLayout,LinearLayout 由两部分组成,第一部分是标题栏,第二部分是内容栏,内容栏是一个 FrameLayout,我们在 Activity 中调用 setContentView 就是将 View 添加到这个 FrameLayout 中,所以给大家一种错觉仿佛 Activity 的根布局很特殊,其实不然。