
参考文档:
Mockito教程
【java】单元测试Mockito中的Mock和Spy
@InjectMocks
Mockito Verify常见用法
1. Mockito 介绍
1.1 Mockito 是什么
Mockito 是 mocking 框架,它让你用简洁的 API 做测试。
1.2 为什么需要 Mock
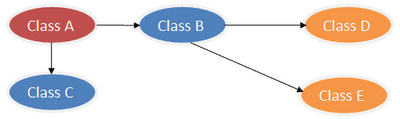
测试驱动的开发( TDD)要求我们先写单元测试,再写实现代码。在写单元测试的过程中,我们往往会遇到要测试的类有很多依赖,这些依赖的类/对象/资源又有别的依赖,从而形成一个大的依赖树,要在单元测试的环境中完整地构建这样的依赖,是一件很困难的事情。如下图所示:
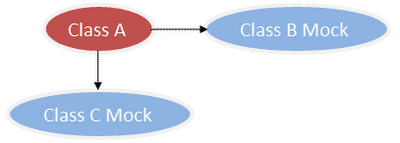
为了测试类 A,我们需要 Mock B 类和 C 类(用虚拟对象来代替)如下图所示:
Mock 是类的实例,是一个虚拟对象,并不是实际对象,不太好理解,看下面例子。
下面例子基于引用
import static org.mockito.Mockito.*;
import static org.junit.jupiter.api.Assertions.*;
2. 实例
2.1 验证行为
@Test
public void verify_behaviour(){
	//模拟创建一个List对象
	List mock = mock(List.class);
	//使用mock的对象
	mock.add(1);
	mock.clear();
	// 验证add(1)和clear()行为是否发生
	verify(mock).add(1);
	verify(mock).clear();
}
2.2 模拟我们所期望的值
@Test
public void when_thenReturn(){
    // mock一个Iterator类
    Iterator iterator = mock(Iterator.class);
    // 预设当iterator调用next()时第一次返回hello,第n次都返回world
    when(iterator.next()).thenReturn("hello").thenReturn("world");
    // 使用mock的对象
    String result = iterator.next() + " " + iterator.next() + " " + iterator.next();
    // 验证结果
    assertEquals("hello world world",result);
}
@Test
public void with_arguments(){
    Comparable comparable = mock(Comparable.class);
    //预设根据不同的参数返回不同的结果
    when(comparable.compareTo("Test")).thenReturn(1);
    when(comparable.compareTo("Omg")).thenReturn(2);
    assertEquals(1, comparable.compareTo("Test"));
    assertEquals(2, comparable.compareTo("Omg"));
    //对于没有预设的情况会返回默认值
    assertEquals(0, comparable.compareTo("Not stub"));
}
@Test
public void with_unspecified_arguments(){
    List list = mock(List.class);
    //匹配任意参数
    when(list.get(anyInt())).thenReturn(1);
    when(list.contains(argThat(new IsValid()))).thenReturn(true);
    assertEquals(1, list.get(1));
    assertEquals(1, list.get(999));
    assertTrue(list.contains(1));
    assertTrue(!list.contains(3));
}
2.3 @Mock
在上面的测试中我们在每个测试方法里都mock了一个List对象,为了避免重复的mock,是测试类更具有可读性,我们可以使用下面的注解方式来快速模拟对象:
@Mock
private List mockList;
运行这个测试类你会发现报错了,mock的对象为NULL,为此我们必须在基类中添加初始化mock的代码
public class MockitoExample2 {
    @Mock
    private List mockList;

    public MockitoExample2(){
        MockitoAnnotations.initMocks(this);
    }

    @Test
    public void shorthand(){
        mockList.add(1);
        verify(mockList).add(1);
    }
}
或者使用 MockitoExtension
@ExtendWith(MockitoExtension.class)
public class MockitoExample2 {
    @Mock
    private List mockList;

    public MockitoExample2(){
        MockitoAnnotations.initMocks(this);
    }

    @Test
    public void shorthand(){
        mockList.add(1);
        verify(mockList).add(1);
    }
}
2.4 @Spy
- Mock不是真实的对象,它只是用类型的class创建了一个虚拟对象,并可以设置对象行为
- Spy是一个真实的对象,但它可以设置对象行为
- 设置 spy 逻辑时不能再使用
when(某对象.某方法).thenReturn(某对象)的语法,而是需要使用doReturn(某对象).when(某对象).某方法或者doNothing(某对象).when(某对象).某方法。
public class Main {

    public void fun(String s) {
        System.out.println(s + " : fun");
        fun1(s);
        fun2(s);
    }

    public void fun1(String s) {
        System.out.println(s + " : fun1");
    }

    private void fun2(String s) {
        System.out.println(s + " : fun2");
    }

    public int getVal(){
        return 5;
    }
}
mock 使用实例
- 使用 doCallRealMethod().when() 调用函数真正部分。
- 使用 when().thenReturn 自定义函数返回值。
@ExtendWith(MockitoExtension.class)
 public class MainTest {

    @Mock
    Main mockMain;

    @Test
    public void testFun() {
        // 执行mock,而不是真正部分,所以没有打印任何信息
        mockMain.fun("mock test One");

        // doCallRealMethod声明后,执行真正部分
        // 但是Mock只能对public(fun1)和protected函数进行mock
        // 对private函数(fun2)仍执行真正部分
        // 所以输出fun和fun2
        doCallRealMethod().when(mockMain).fun(anyString());
        mockMain.fun("mock test Two");

        // 执行mock,输出int的默认值0,而不是5
        System.out.println("val: " + mockMain.getVal());
        // when声明后,既不走真正部分,也不走mock,直接返回thenReturn()中定义的值
        // 注意:该值的类型需要和when中函数返回值类型一致
        when(mockMain.getVal()).thenReturn(10);
        System.out.println("val: " + mockMain.getVal());
    }

}

Spy 使用实例
使用 when().thenReturn 自定义函数返回值。
@ExtendWith(MockitoExtension.class)
public class MainTest {

    @Spy
    Main spyMain;

    @Test
    public void testFun() {
        // 执行真正部分
        spyMain.fun("mock test One");

        // 执行真正部分
        System.out.println("val: " + spyMain.getVal());
        // 自定义返回值
        when(spyMain.getVal()).thenReturn(10);
        System.out.println("val: " + spyMain.getVal());
    }
}

2.5 @InjectMocks
-
@InjectMocks:创建一个实例,其余用@Mock(或@Spy)注解创建的mock将被注入到用该实例中。
-
spring 使用 @Autowird 等方式完成自动注入。在单元测试中,没有启动 spring 框架,@Autowird 无法自动注入,此时就需要通过 @InjectMocks完成依赖注入。
-
@InjectMocks 是无法注入其他 @InjectMocks 字段的,比如:
@ExtendWith(MockitoExtension.class)
public class MyControllerTest {

    @Mock
    private MyRepository myRepository;

    @InjectMocks
    private MyService myService;

    @InjectMocks
    private MyController myController;

    @Test
    public void doSomething() throws Exception {
        this.myController.doSomething();
    }
}
2.6 @ExtendWith(SpringExtension.class)
当涉及Spring时:
如果您想在测试中使用 Spring 测试框架功能(例如)@MockBean,则必须使用 @ExtendWith(SpringExtension.class)。它取代了不推荐使用的 JUnit4 @RunWith(SpringJUnit4ClassRunner.class)。
引入后,在 springboot 项目中,依旧无法使用 @Autowired, 无法加载 bean,只是配置了容器。
当不涉及Spring时:
例如,如果您只想涉及Mockito而不必涉及Spring,那么当您只想使用 @Mock/ @InjectMocks 批注时,您就想使用 @ExtendWith(MockitoExtension.class),因为它不会加载到很多不需要的 Spring 东西中。它替换了不推荐使用的 JUnit4 @RunWith(MockitoJUnitRunner.class)。
2.7 @MockBean
我们可以使用 @mockBean 注解将 Mock 对象添加到 Spring 上下文中。
Mock 将替换 Spring 上下文中任何相同类型的现有 bean,如果没有定义相同类型的 bean,将添加一个新的 bean。
2.8 @SpyBean
注入真实对象,受 spring 管理,相当于自动替换对应类型 bean 的注入,比如 @Autowired 注入。
@SpyBean 解决了 SpringBoot 的单元测试中 @MockBean 不能 mock 库中自动装配的 Bean 的局限。使 SpringBoot 的单元测试更灵活也更简单。
@ExtendWith(SpringExtension.class)
public class MyTest {

    @MockBean
    private MyMapper mapper;

    @SpyBean
    private MyService myService;

    @Test
    void test() {
        System.out.println(myService.getUsername());
    }

}