
推荐阅读:
一、SpringBoot 基础
1. SpringBoot 简介
1.1 Spring 缺点
- 配置复杂
- 依赖管理比较麻烦,费时费力
1.2 SpringBoot 特点
- 起步依赖,就是将具备某种功能的坐标打包到一起,并提供一些默认的功能
- 自动配置,开箱即用,没有代码生成,也无需 xml 配置
2. SpringBoot 快速入门
2.1 手动创建项目
创建基本 maven 工程
添加 SpringBoot 起步依赖
SpringBoot 要求,项目要继承 SpringBoot 的起步依赖 spring-boot-starter-parent
<parent>
    <groupId>org.springframework.boot</groupId>
    <artifactId>spring-boot-starter-parent</artifactId>
    <version>2.0.1.RELEASE</version>
</parent>
SpringBoot 要集成 SpringMVC 进行 Controller 的开发,所以项目要导入 web 的启动依赖
<dependencies>
    <dependency>
        <groupId>org.springframework.boot</groupId>
        <artifactId>spring-boot-starter-web</artifactId>
    </dependency>
</dependencies>
编写 SpringBoot 引导类
要通过 SpringBoot 提供的引导类起步 SpringBoot 才可以进行访问
import org.springframework.boot.SpringApplication;
import org.springframework.boot.autoconfigure.SpringBootApplication;

// 声明此类是引导类
@SpringBootApplication
public class MySpringBootApplication {
  public static void main(String[] args) {
    // 启动程序,传入引导类字节码对象
    SpringApplication.run(MySpringBootApplication.class);
  }
}
我们需要将引导类放置在项目的根包目录下,与 comtroller,service,dao 包平级,springboot 会自动扫描与引导类平级的包及其子目录下文件的注解
然后编写 controller ,即可发现能够使用
2.2 自动生成项目
使用 idea 新建项目的时候不要选择 maven,选择左边的 Spring Initializr
根据需求勾选需要组件即可
自动生成的 ServletInitializer 说明
ServletInitializer.java
public class ServletInitializer extends SpringBootServletInitializer {

    @Override
    protected SpringApplicationBuilder configure(SpringApplicationBuilder application) {
        return application.sources(SpringSecurityApplication.class);
    }

}
Springboot 启动方式有多种,常用的就是 application 启动类启动,直接 run 即可。
我们也可以使用外置 tomcat 启动,这时候就使用到了此类,此类需要继承 SpringBootServletInitializer 类并复写 configure() 方法,SpringBootServletInitializer 的执行过程,简单来说就是通过 SpringApplicationBuilder 构建并封装 SpringApplication 对象,并最终调用 SpringApplication 的 run 方法的过程。
SpringBootServletInitializer 就是原有的 web.xml 文件的替代。
2.3 自动生成项目依赖说明
2.3.1 Developer Tools
Spring Boot Devtools
热部署使用,具体请看 2.4
Spring Configuration Processor
依赖作用:spring-configuration-metadata.json文件是做啥的?
spring boot 默认使用 yml/properties 中的配置,但有时候要用传统的 xml 或 其他配置文件,这时候就需要用到 spring configuration processor。
在配置类开头加上 @PropertySource("classpath:your.xml"),其余用法与加载 yml 的配置一样
@PropertySource 中的属性
- value:指明加载配置文件的路径。
- ignoreResourceNotFound:指定的配置文件不存在是否报错,默认是false。当设置为 true 时,若该文件不存在,程序不会报错。实际项目开发中,最好设置 ignoreResourceNotFound 为 false。
- encoding:指定读取属性文件所使用的编码,我们通常使用的是UTF-8。
@ConfigurationProperties 设定前缀,这样就不用在每个属性前面设置 @Value("${user.*}") 了
@ConfigurationProperties(prefix = "user")
@PropertySource(value = {"classpath:resources/user.xml"},
        ignoreResourceNotFound = false, encoding = "UTF-8")
// 自动读取配置文件中的 user.name,user.age 赋给对应变量
public class User {
    private String name;
    private int age;
}
2.3.2 Web
Spring Web
构建 web 项目,使用 spring mvc 框架,使用 tomcat 当做默认服务器
2.4 SpringBoot 工程热部署
添加依赖
<dependency>
    <groupId>org.springframework.boot</groupId>
    <artifactId>spring-boot-devtools</artifactId>
</dependency>
开启自动编译
Idea -> settings -> build、execution、deployment -> compiler -> 勾选 Build project automatically
设置注册表
然后 shift+ctrl+alt+/ -> 选择 registry -> 勾选 compiler.automake.allow.when.runing
3. SpringBoot 原理分析
3.1 分析 spring-boot-starter-parent
查看 pom.xml 中,parent 标签中 spring-boot-starter-parent, 跳转到了 spring-boot-starter-parent 的 pom.xml,重点部分如下
<parent>
  <groupId>org.springframework.boot</groupId>
  <artifactId>spring-boot-dependencies</artifactId>
  <version>2.4.2</version>
</parent>

<resource>
  <directory>${basedir}/src/main/resources</directory>
  <filtering>true</filtering>
  <includes>
    <include>**/application*.yml</include>
    <include>**/application*.yaml</include>
    <include>**/application*.properties</include>
  </includes>
</resource>
我们发现自动扫描了 resources 中以 application 开头的三个配置文件,我们一般使用 yml 来替换默认配置,注意,如果我们既使用了 yml 也使用了 properties,则properties 配置会覆盖 yml 配置。
filtering 的作用参考:maven Filtering true 作用
我们继续查看 spring-boot-starter-parent 的 parent,spring-boot-dependencies
<properties>
    <activemq.version>5.15.3</activemq.version>
    <antlr2.version>2.7.7</antlr2.version>
    <appengine-sdk.version>1.9.63</appengine-sdk.version>
    <artemis.version>2.4.0</artemis.version>
    <aspectj.version>1.8.13</aspectj.version>
    <assertj.version>3.9.1</assertj.version>
    <atomikos.version>4.0.6</atomikos.version>
    <bitronix.version>2.1.4</bitronix.version>
    <build-helper-maven-plugin.version>3.0.0</build-helper-maven-plugin.version>
    <byte-buddy.version>1.7.11</byte-buddy.version>
</properties>
<dependencyManagement>
    <dependencies>
        <dependency>
            <groupId>org.springframework.boot</groupId>
            <artifactId>spring-boot</artifactId>
            <version>2.0.1.RELEASE</version>
        </dependency>
        <dependency>
            <groupId>org.springframework.boot</groupId>
            <artifactId>spring-boot-test</artifactId>
            <version>2.0.1.RELEASE</version>
        </dependency>
    </dependencies>
</dependencyManagement>
<build>
    <pluginManagement>
        <plugins>
            <plugin>
                <groupId>org.jetbrains.kotlin</groupId>
                <artifactId>kotlin-maven-plugin</artifactId>
                <version>${kotlin.version}</version>
            </plugin>
            <plugin>
                <groupId>org.jooq</groupId>
                <artifactId>jooq-codegen-maven</artifactId>
                <version>${jooq.version}</version>
            </plugin>
            <plugin>
                <groupId>org.springframework.boot</groupId>
                <artifactId>spring-boot-maven-plugin</artifactId>
                <version>2.0.1.RELEASE</version>
            </plugin>
        </plugins>
    </pluginManagement>
</build>
从上面的 pom.xml 中我们可以发现,一部分坐标的版本、依赖管理、插件管理已经定义好,所以我们的 SpringBoot 工程继承 spring-boot-starter-parent 后已经具备版本锁定等配置了。所以起步依赖的作用就是进行依赖的传递。
3.2 分析 spring-boot-starter-web
查看 pom.xml 中的 spring-boot-starter-web,跳转到了spring-boot-starter-web 的pom.xml,xml 配置如下(只摘抄了部分重点配置):
<?xml version="1.0" encoding="UTF-8"?>
<project xsi:schemaLocation="http://maven.apache.org/POM/4.0.0 http://maven.apache.org/xsd/maven-4.0.0.xsd" xmlns="http://maven.apache.org/POM/4.0.0"
    xmlns:xsi="http://www.w3.org/2001/XMLSchema-instance">
  <dependencies>
    <dependency>
      <groupId>org.springframework.boot</groupId>
      <artifactId>spring-boot-starter</artifactId>
      <version>2.4.2</version>
      <scope>compile</scope>
    </dependency>
    <dependency>
      <groupId>org.springframework.boot</groupId>
      <artifactId>spring-boot-starter-json</artifactId>
      <version>2.4.2</version>
      <scope>compile</scope>
    </dependency>
    <dependency>
      <groupId>org.springframework.boot</groupId>
      <artifactId>spring-boot-starter-tomcat</artifactId>
      <version>2.4.2</version>
      <scope>compile</scope>
    </dependency>
    <dependency>
      <groupId>org.springframework</groupId>
      <artifactId>spring-web</artifactId>
      <version>5.3.3</version>
      <scope>compile</scope>
    </dependency>
    <dependency>
      <groupId>org.springframework</groupId>
      <artifactId>spring-webmvc</artifactId>
      <version>5.3.3</version>
      <scope>compile</scope>
    </dependency>
  </dependencies>
</project>
从上面的 spring-boot-starter-web 的 pom.xml 中我们可以发现,spring-boot-starter-web 就是将 web 开发要使用的 spring-web、spring-webmvc 等坐标进行了“打包”,这样我们的工程只要引入 spring-boot-starter-web 起步依赖的坐标就可以进行 web 开发了,同样体现了依赖传递的作用。
3.3 自动配置原理解析
查看启动类的注解 @SpringBootApplication,源码如下
@Target(ElementType.TYPE)
@Retention(RetentionPolicy.RUNTIME)
@Documented
@Inherited
@SpringBootConfiguration
@EnableAutoConfiguration
@ComponentScan(excludeFilters = { @Filter(type = FilterType.CUSTOM, classes = TypeExcludeFilter.class),
		@Filter(type = FilterType.CUSTOM, classes = AutoConfigurationExcludeFilter.class) })
public @interface SpringBootApplication {
	@AliasFor(annotation = EnableAutoConfiguration.class)
	Class<?>[] exclude() default {};
}
- @SpringBootConfifiguration:等同与 @Confifiguration,既标注该类是 Spring的一个配置类
- @EnableAutoConfifiguration:SpringBoot 自动配置功能开启
查看注解 @EnableAutoConfifiguration
@Target(ElementType.TYPE)
@Retention(RetentionPolicy.RUNTIME)
@Documented
@Inherited
@AutoConfigurationPackage
@Import(AutoConfigurationImportSelector.class)
public @interface EnableAutoConfiguration {}
其中,@Import(AutoConfifigurationImportSelector.class) 导入了AutoConfifigurationImportSelector 类,查看源码
protected AutoConfigurationEntry getAutoConfigurationEntry(AnnotationMetadata annotationMetadata) {
    if (!isEnabled(annotationMetadata)) {
        return EMPTY_ENTRY;
    }
    AnnotationAttributes attributes = getAttributes(annotationMetadata);
    List<String> configurations = getCandidateConfigurations(annotationMetadata, attributes);
    configurations = removeDuplicates(configurations);
    Set<String> exclusions = getExclusions(annotationMetadata, attributes);
    checkExcludedClasses(configurations, exclusions);
    configurations.removeAll(exclusions);
    configurations = getConfigurationClassFilter().filter(configurations);
    fireAutoConfigurationImportEvents(configurations, exclusions);
    return new AutoConfigurationEntry(configurations, exclusions);
}

protected List<String> getCandidateConfigurations(AnnotationMetadata metadata, AnnotationAttributes attributes) {
    List<String> configurations = SpringFactoriesLoader.loadFactoryNames(getSpringFactoriesLoaderFactoryClass(), getBeanClassLoader());
    Assert.notEmpty(configurations, "No auto configuration classes found in META-INF/spring.factories. If you " + "are using a custom packaging, make sure that file is correct.");
    return configurations;
}
其中,SpringFactoriesLoader.loadFactoryNames 方法的作用就是从 META-INF/spring.factories 文件中读取指定类对应的类名称列表
如下:
# Auto Configure
org.springframework.boot.autoconfigure.EnableAutoConfiguration=\
org.springframework.boot.autoconfigure.admin.SpringApplicationAdminJmxAutoConfiguration,\
org.springframework.boot.autoconfigure.aop.AopAutoConfiguration,\
org.springframework.boot.autoconfigure.amqp.RabbitAutoConfiguration,\
org.springframework.boot.autoconfigure.batch.BatchAutoConfiguration,\
org.springframework.boot.autoconfigure.cache.CacheAutoConfiguration,\
上面配置文件存在大量的以 Confifiguration 为结尾的类名称,这些类就是存有自动配置信息的类,而 SpringApplication 在获取这些类名后再加载。
我们以 ServletWebServerFactoryAutoConfiguration 为例来分析源码:
@Configuration(proxyBeanMethods = false)
@AutoConfigureOrder(Ordered.HIGHEST_PRECEDENCE)
@ConditionalOnClass(ServletRequest.class)
@ConditionalOnWebApplication(type = Type.SERVLET)
@EnableConfigurationProperties(ServerProperties.class)
@Import({ ServletWebServerFactoryAutoConfiguration.BeanPostProcessorsRegistrar.class,
		ServletWebServerFactoryConfiguration.EmbeddedTomcat.class,
		ServletWebServerFactoryConfiguration.EmbeddedJetty.class,
		ServletWebServerFactoryConfiguration.EmbeddedUndertow.class })
public class ServletWebServerFactoryAutoConfiguration {}
其中,@EnableConfifigurationProperties(ServerProperties.class) 代表加载 ServerProperties 服务器配置属性类
源码如下:
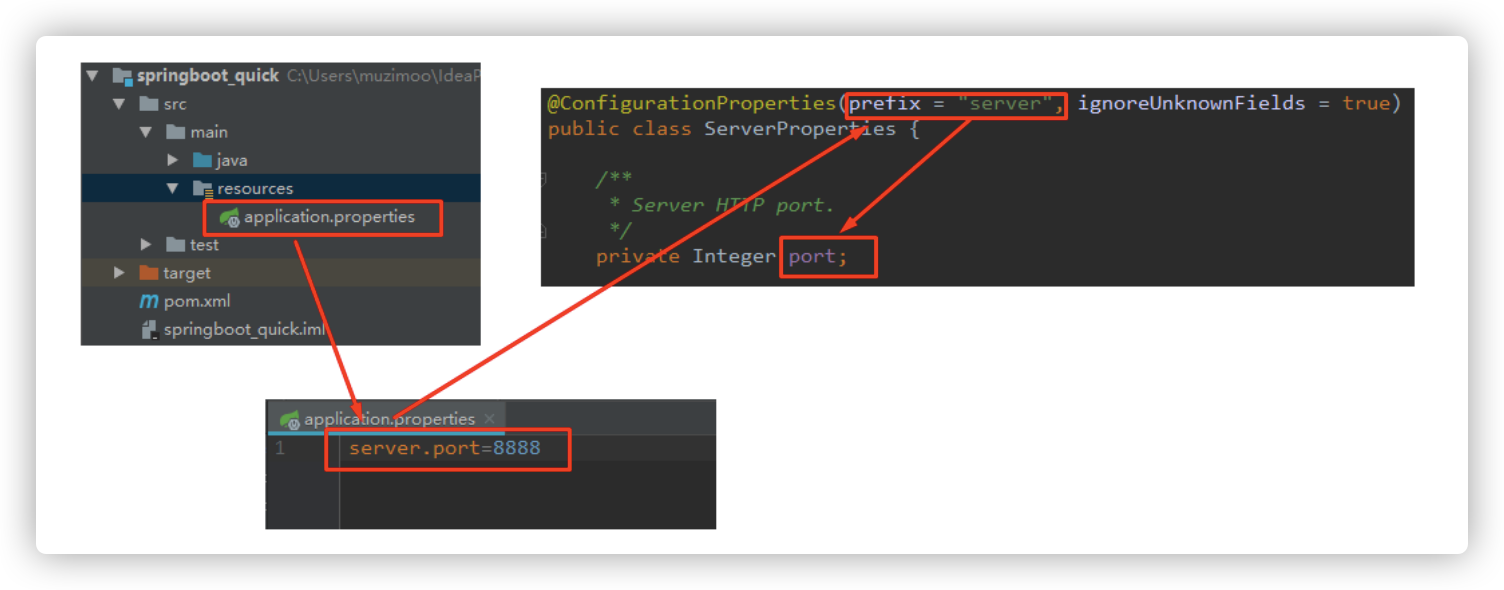
@ConfigurationProperties(prefix = "server", ignoreUnknownFields = true)
public class ServerProperties {
	private Integer port;
	private InetAddress address;
}
其中,prefifix = "server" 表示 SpringBoot 配置文件中的前缀,SpringBoot 会将配置文件中以 server 开始的属性映射到该类的字段中。映射关系如下:
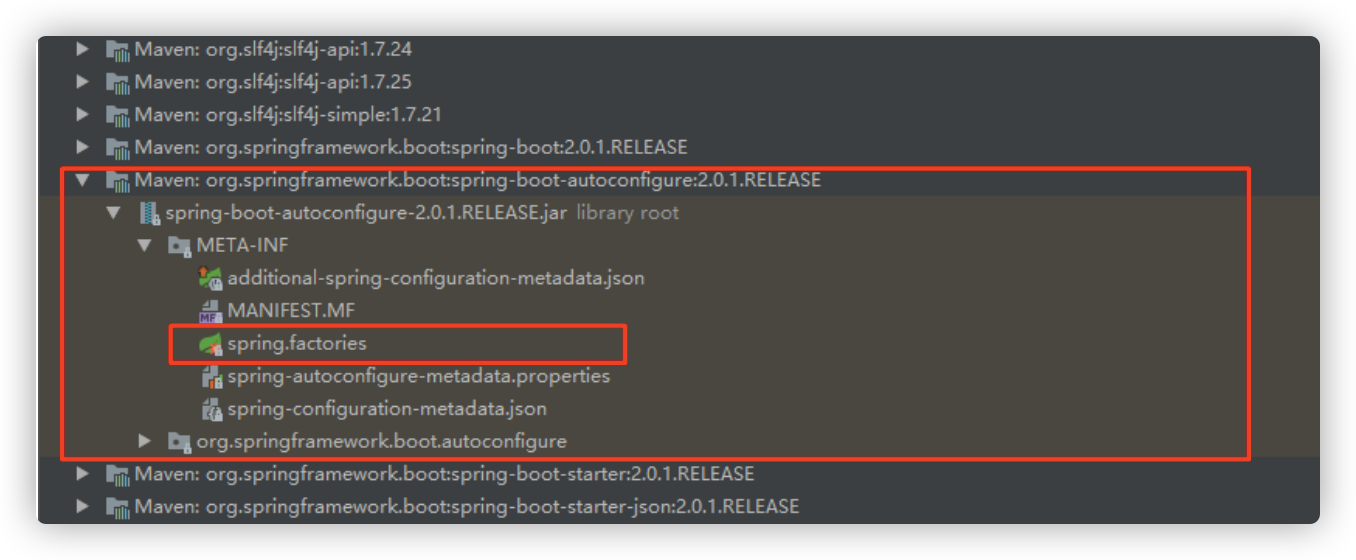
然后查看 spring-boot-autoconfigure 下的 META-INF/spring-configuration-metadata.json ,能够发现如下默认配置
{
	"name": "server.port",
	"type": "java.lang.Integer",
	"description": "Server HTTP port.",
	"sourceType": "org.springframework.boot.autoconfigure.web.ServerProperties",
	"defaultValue": 8080
}
我们可以自定义配置文件来替换默认配置。
4. SpringBoot 的配置文件
SpringBoot 是基于约定的,所以很多配置都有默认值,但如果想使用自己的配置替换默认配置的话,一般使用 application.properties 或者 application.yml(application.yaml)进行配置。
SpringBoot 默认会从 resources 目录下加载 application.properties 或 application.yml(application.yaml)文件
配置信息的查询,上面有提及从源码中查找的方式,也可以从文档查找
文档URL:https://docs.spring.io/spring-boot/docs/2.0.1.RELEASE/reference/htmlsingle/#common-application-properties
常用的配置摘抄如下:
# QUARTZ SCHEDULER (QuartzProperties)
spring.quartz.jdbc.initialize-schema=embedded # Database schema initialization mode.
spring.quartz.jdbc.schema=classpath:org/quartz/impl/jdbcjobstore/tables_@@platform@@.sql # Path to the SQL file to use to initialize the database schema.
spring.quartz.job-store-type=memory # Quartz job store type.
spring.quartz.properties.*= # Additional Quartz Scheduler properties.

# ----------------------------------------
# WEB PROPERTIES
# ----------------------------------------

# EMBEDDED SERVER CONFIGURATION (ServerProperties)
server.port=8080 # Server HTTP port.
server.servlet.context-path= # Context path of the application.
server.servlet.path=/ # Path of the main dispatcher servlet.

# HTTP encoding (HttpEncodingProperties)
spring.http.encoding.charset=UTF-8 # Charset of HTTP requests and responses. Added to the "Content-Type" header if not set explicitly.

# JACKSON (JacksonProperties)
spring.jackson.date-format= # Date format string or a fully-qualified date format class name. For instance, `yyyy-MM-dd HH:mm:ss`.

# SPRING MVC (WebMvcProperties)
spring.mvc.servlet.load-on-startup=-1 # Load on startup priority of the dispatcher servlet.
spring.mvc.static-path-pattern=/** # Path pattern used for static resources.
spring.mvc.view.prefix= # Spring MVC view prefix.
spring.mvc.view.suffix= # Spring MVC view suffix.

# DATASOURCE (DataSourceAutoConfiguration & DataSourceProperties)
spring.datasource.driver-class-name= # Fully qualified name of the JDBC driver. Auto- detected based on the URL by default.
spring.datasource.password= # Login password of the database.
spring.datasource.url= # JDBC URL of the database.
spring.datasource.username= # Login username of the database.

# JEST (Elasticsearch HTTP client) (JestProperties)
spring.elasticsearch.jest.password= # Login password.
spring.elasticsearch.jest.proxy.host= # Proxy host the HTTP client should use.
spring.elasticsearch.jest.proxy.port= # Proxy port the HTTP client should use.
spring.elasticsearch.jest.read-timeout=3s # Read timeout.
spring.elasticsearch.jest.username= # Login username.
我们可以通过配置 application.poperties 或者 application.yml 来修改 SpringBoot 的默认配置
例如
# application.properties 文件
server.port=8888
server.servlet.context-path=demo

# application.yml 文件
server:
  port: 8888
  servlet:
    context-path: /demo
5. 配置文件与配置类的属性映射方式
6. SpringBoot 整合其他技术
6.1 整合 Mybatis
添加依赖
<!--mybatis起步依赖-->
<dependency>
    <groupId>org.mybatis.spring.boot</groupId>
    <artifactId>mybatis-spring-boot-starter</artifactId>
    <version>1.1.1</version>
</dependency>
<!-- MySQL连接驱动 -->
<dependency>
    <groupId>mysql</groupId>
    <artifactId>mysql-connector-java</artifactId>
</dependency>
配置连接信息
application.properties
#DB Configuration:
spring.datasource.driverClassName=com.mysql.jdbc.Driver
spring.datasource.url=jdbc:mysql://127.0.0.1:3306/test?useUnicode=true&characterEncoding=utf8
spring.datasource.username=root
spring.datasource.password=root
编写业务
**在 application.properties 中添加 mybatis 的信息 **
#spring集成Mybatis环境
#pojo别名扫描包
mybatis.type-aliases-package=com.itheima.domain
#加载Mybatis映射文件
mybatis.mapper-locations=classpath:mapper/*Mapper.xml
6.2 整合 Junit
添加依赖
<!--测试的起步依赖-->
<dependency>
    <groupId>org.springframework.boot</groupId>
    <artifactId>spring-boot-starter-test</artifactId>
    <scope>test</scope>
</dependency>
编写测试类
package com.itheima.test;

import com.itheima.MySpringBootApplication;
import com.itheima.domain.User;
import com.itheima.mapper.UserMapper;
import java.util.List;
import org.junit.Test;
import org.junit.runner.RunWith;
import org.springframework.beans.factory.annotation.Autowired;
import org.springframework.boot.test.context.SpringBootTest;
import org.springframework.test.context.junit4.SpringRunner;

@RunWith(SpringRunner.class)
@SpringBootTest(classes = MySpringBootApplication.class)
public class MapperTest {

  @Autowired
  private UserMapper userMapper;

  @Test
  public void test() {
    List<User> users = userMapper.queryUserList();
    System.out.println(users);
  }
}
- SpringRunner 继承自 SpringJUnit4ClassRunner,使用哪一个 Spring 提供的测试测试引擎都可以。
- @SpringBootTest 的属性指定的是引导类的字节码对象
6.3 整个 Redis
添加依赖
<!-- 配置使用redis启动器 -->
<dependency>
    <groupId>org.springframework.boot</groupId>
    <artifactId>spring-boot-starter-data-redis</artifactId>
</dependency>
配置连接信息
# Redis
spring.redis.host=127.0.0.1
spring.redis.port=6379
测试
@RunWith(SpringRunner.class)
@SpringBootTest(classes = SpringbootJpaApplication.class)
public class RedisTest {

  @Autowired
  private UserRepository userRepository;

  @Autowired
  private RedisTemplate<String, String> redisTemplate;

  @Test
  public void test() throws JsonProcessingException { //从redis缓存中获得指定的数据
    String userListData = redisTemplate.boundValueOps("user.findAll").get();
    //如果redis中没有数据的话
    if (null == userListData) {
      //查询数据库获得数据
      List<User> all = userRepository.findAll();
      //转换成json格式字符串
      ObjectMapper om = new ObjectMapper();
      userListData = om.writeValueAsString(all);
      //将数据存储到redis中,下次在查询直接从redis中获得数据,不用在查询数据库
      redisTemplate.boundValueOps("user.findAll").set(userListData);
      System.out.println("===============从数据库获得数据===============");
    } else {
      System.out.println("===============从redis缓存中获得数据===============");
    }
    System.out.println(userListData);
  }
}
6.4 整合 Spring Data JPA
添加依赖
<!-- springBoot JPA的起步依赖 -->
<dependency>
    <groupId>org.springframework.boot</groupId>
    <artifactId>spring-boot-starter-data-jpa</artifactId>
</dependency>
<!--jdk9需要导入如下坐标-->
<dependency>
    <groupId>javax.xml.bind</groupId>
    <artifactId>jaxb-api</artifactId>
    <version>2.3.0</version>
</dependency>
配置文件
application.properties
#DB Configuration:
spring.datasource.driverClassName=com.mysql.jdbc.Driver
spring.datasource.url=jdbc:mysql://127.0.0.1:3306/test?useUnicode=true&characterEncoding=utf8
spring.datasource.username=root
spring.datasource.password=root

#JPA Configuration:
spring.jpa.database=MySQL
spring.jpa.show-sql=true
spring.jpa.generate-ddl=true
spring.jpa.hibernate.ddl-auto=update
spring.jpa.hibernate.naming_strategy=org.hibernate.cfg.ImprovedNamingStrategy
创建实体类
@Entity
public class User {
  // 主键
  @Id
  @GeneratedValue(strategy = GenerationType.IDENTITY)
  private Long id; // 用户名
  private String username; // 密码
  private String password; // 姓名
  private String name;
  //此处省略setter和getter方法... ...
}
编写 UserRepository
public interface UserRepository extends JpaRepository<User, Long> {
  public List<User> findAll();
}
编写测试类
@RunWith(SpringRunner.class)
@SpringBootTest(classes = MySpringBootApplication.class)
public class JpaTest {

  @Autowired
  private UserRepository userRepository;

  @Test
  public void test() {
    List<User> users = userRepository.findAll();
    System.out.println(users);
  }
}
二、spring-boot-starter
参考文档:
附加:Spring Boot项目中,spring相关依赖分析;(主要是spring-boot-starter依赖、spring-boot-starter-web依赖等)
SpringBootStarter的原理以及自定义简单的starter步骤
聊完基础,我们探讨一下 spring-boot-starter 到底起了什么作用。
1. Starter 是什么
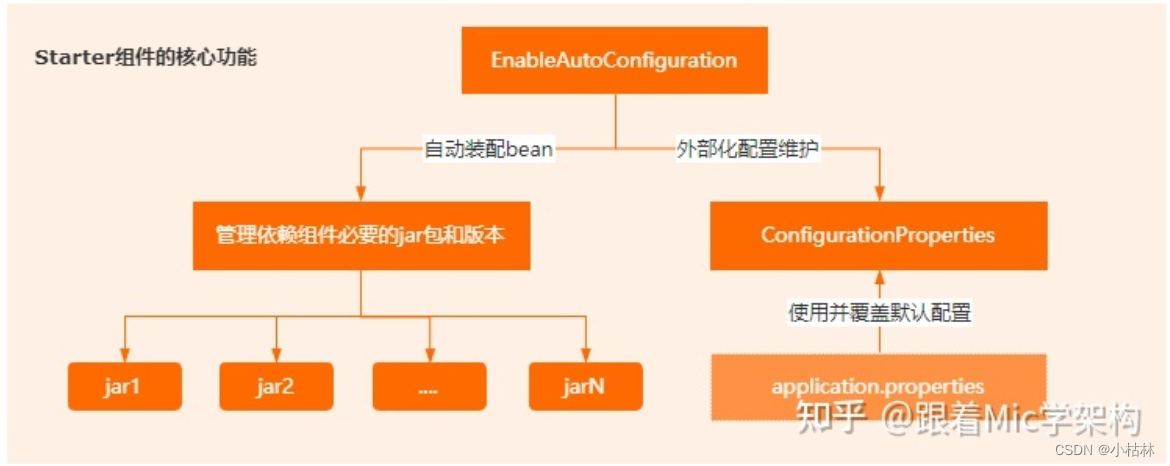
Starter 是 Spring Boot 的四大核心功能特性之一,除此之外,Spring Boot 还有自动装配、Actuator 监控等特性。Spring Boot 里面的这些特性,都是为了让开发者在开发基于 Spring 生态下的企业级应用时,只需要关心业务逻辑,减少对配置和外部环境的依赖。
其中,Starter 是启动依赖,它的主要作用有几个。
- Starter 组件以功能为纬度,来维护对应的jar包的版本依赖,使得开发者可以不需要去关心这些版本冲突这种容易出错的细节。
- Starter 组件会把对应功能的所有jar包依赖全部导入进来,避免了开发者自己去引入依赖带来的麻烦。
- Starter 内部集成了自动装配的机制,也就说在程序中依赖对应的 starter 组件以后,这个组件自动会集成到 Spring 生态下,并且对于相关 Bean 的管理,也是基于自动装配机制来完成。
- 依赖 Starter 组件后,这个组件对应的功能所需要维护的外部化配置,会自动集成到 Spring Boot 里面,我们只需要在
application.properties文件里面进行维护就行了,比如 Redis这 个 starter,只需要在application.properties文件里面添加 redis 的连接信息就可以直接使用了。
Starter 组件几乎完美的体现了 Spring Boot 里面约定优于配置的理念。
另外,Spring Boot 官方提供了很多的 Starter 组件,比如 Redis、JPA、 MongoDB 等等。但是官方并不一定维护了所有中间件的 Starter,所以对于不存在的 Starter,第三方组件一般会自己去维护一个。官方的 starter 和第三方的 starter 组件,最大的区别在于命名上。
- 官方维护的 starter: spring-boot-starter-xxx
- 第三方维护的 starter: xxx-spring-boot-starter
2. 自定义 starter
pom.xml
<?xml version="1.0" encoding="UTF-8"?>
<project xmlns="http://maven.apache.org/POM/4.0.0"
         xmlns:xsi="http://www.w3.org/2001/XMLSchema-instance"
         xsi:schemaLocation="http://maven.apache.org/POM/4.0.0
                             http://maven.apache.org/xsd/maven-4.0.0.xsd">
    <modelVersion>4.0.0</modelVersion>
    <parent>
        <groupId>org.springframework.boot</groupId>
        <artifactId>spring-boot-starter-parent</artifactId>
        <version>2.2.2.RELEASE</version>
        <relativePath/>
    </parent>
    <groupId>cn.test</groupId>
    <artifactId>hello-spring-boot-starter</artifactId>
    <version>1.0-SNAPSHOT</version>
    <dependencies>
        <dependency>
            <groupId>org.springframework.boot</groupId>
            <artifactId>spring-boot-starter</artifactId>
        </dependency>
    </dependencies>
</project>
config 文件
@Configuration
@ConfigurationProperties(prefix = "request-log")
public class TestConfig {

    @Bean
    @ConditionalOnProperty(prefix = "request-log", name = "enable", havingValue = "true")
    public RequestLogInterceptor requestLogInterceptor() {
        return new RequestLogInterceptor();
    }
}
META-INF/spring.factories
org.springframework.boot.autoconfigure.EnableAutoConfiguration=\
    com.rs.starter.log.RequestLogConfig
然后别的工程引用就行。
3. 自动配置条件
在 bean 上,我们可以配置完成自动配置的条件,比如
@Configuration
@ConditionalOnClass({SqlSessionFactory.class, SqlSessionFactoryBean.class})
@ConditionalOnSingleCandidate(DataSource.class)
@EnableConfigurationProperties(MybatisPlusProperties.class)
@AutoConfigureAfter({DataSourceAutoConfiguration.class, MybatisPlusLanguageDriverAutoConfiguration.class})
public class MybatisPlusAutoConfiguration implements InitializingBean {}
| 注解 | 功能说明 |
|---|---|
| @ConditionalOnBean | 仅在当前上下文中存在某个bean时,才会实例化这个Bean |
| @ConditionalOnClass | 某个class位于类路径上,才会实例化这个Bean |
| @ConditionalOnExpression | 当表达式为true的时候,才会实例化这个Bean |
| @ConditionalOnMissingBean | 仅在当前上下文中不存在某个bean时,才会实例化这个Bean |
| @ConditionalOnMissingClass | 某个class在类路径上不存在的时候,才会实例化这个Bean |
| @ConditionalOnNotWebApplication | 不是web应用时才会实例化这个Bean |
| @AutoConfigureAfter | 在某个bean完成自动配置后实例化这个bean |
| @AutoConfigureBefore | 在某个bean完成自动配置前实例化这个bean |
4. spring-boot-starter-parent 的作用
我们先看下创建 springboot 项目的两种方式 :spring-boot-starter-parent 与 spring-boot-dependencies区别
当我们创建一个 Spring Boot 工程时,可以继承自一个 spring-boot-starter-parent, 也可以不继承自它,我们先来看第一种情况。
4.1 继承 parent
先来看 parent 的基本功能有哪些?
- 定义了 Java 编译版本为 1.8。
- 使用 UTF-8 格式编码。
- 继承自 spring-boot-dependencies,这个里边定义了依赖的版本,也正是因为继承了这个依赖,所以我们在写依赖时才不需要写版本号。
- 执行打包操作的配置。
- 自动化的资源过滤。
- 自动化的插件配置。
- 针对
application.properties和application.yml的资源过滤,包括通过 profile 定义的不同环境的配置文件,例如application-dev.properties和application-devyml
请注意,由于 application.properties和application.yml 文件接受 Spring 样式占位符 ${...},因此 Maven 过滤更改为使用 @...@ 占位符,当然开发者可以通过设置名为 resource.delimiter 的Maven 属性来覆盖@...@ 占位符。
4.2 spring-boot-dependencies
<dependencyManagement>
     <dependencies>
        <dependency>
            <!-- Import dependency management from Spring Boot -->
            <groupId>org.springframework.boot</groupId>
            <artifactId>spring-boot-dependencies</artifactId>
            <version>2.1.3.RELEASE</version>
            <type>pom</type>
            <scope>import</scope>
        </dependency>
    </dependencies>
</dependencyManagement>
这样写之后,依赖的版本号问题虽然解决了,但是关于打包的插件、编译的 JDK版本、文件的编码格式等等这些配置,在没有 parent 的时候, 这些统统要自己去配置。
5. springboot 常见依赖
spring-boot-starter这是 Spring Boot 的核心启动器,包含了自动配置、日志和 YAML。spring-boot-starter-amqp通过 spring-rabbit 来支持 AMQP 协议(Advanced Message Queuing Protocol。spring-boot-starter-aop支持面向方面的编程即 AOP,包括 spring-aop 和 AspectJ。spring-boot-starter-artemis通过 Apache Artemis 支持 JMS 的 API (Java Message Service APl。spring-boot-starter-batch支持 Spring Batch,包括 HSQLDB 数据库。spring-boot-starter-cache支持 Spring 的 Cache 抽象。spring-boot-starter-cloud-connectors支持Spring Cloud Connectors,简化了在像 Cloud Foundry 或 Heroku 这样的云平台上连接服务。spring-boot-starter-data-elasticsearch支持 ElasticSearch 搜索和分析引擎,包括 spring-data-elasticsearch。spring-boot-starter-data-gemfire支持 GemFire 分布式数据存储,包括 spring-data-gemfire。spring-boot-starter-data-jpa支持 JPA (Java Persistence APl,包括spring-data-jpa、 spring-orm、 Hibernate。spring-boot-starter-data-mongodb支持 MongoDB 数据,包括 spring-data-mongodb。spring-boot-starter-data-rest通过 spring-data-rest-webmvc,支持通过 REST 暴露 Spring Data 数据仓库。spring-boot-starter-data-solr支持 Apache Solr 搜索平台,包括 spring-data-solr。spring-boot-starter-freemarker支持 FreeMarker 模板引擎。spring-boot-starter-groovy-templates支持 Groovy 模板引擎。spring-boot-starter-hateoas通过 spring-hateoas 支持基于 HATEOAS 的 RESTful Web 服务。spring-boot-starter-hornetq通过 HornetQ 支持 JMS。spring-boot-starter-integration支持通用的 spring-integration 模块。spring-boot-starter-jdbc支持 JDBC 数据库。spring-boot-starter -jersey支持 Jersey RESTful Web 服务框架。spring-boot-starter-jta-atomikos通过 Atomikos 支持 JTA 分布式事务处理。spring-boot-starter-jta-bitronix通过 Bitronix 支持 JTA 分布式事务处理。spring-boot-starter-mail支持 ijavax.mail 模块。spring-boot-starter-mobile支持 spring-mobile。spring-boot-starter-mustache支持 Mustache 模板引擎。spring-boot-starter-redis支持 Redis 键值存储数据库,包括 spring-redis。spring-boot-starter-security支持 spring-security。spring-boot-starter-social-facebook支持 spring-social-facebookspring-boot-starter-social-linkedin支持 pring-social-linkedin- spring-boot-starter-social-twitter` 支持 pring-social-twitter
spring-boot-starter-test支持常规的测试依赖,包括 JUnit、 Hamcrest. Mockito 以及 spring-test 模块。spring-boot-starter-thymeleaf支持 Thymeleaf 模板引擎,包括与 Spring 的集成。spring-boot-starter-velocity支持 Velocity 模板引擎。spring-boot-starter-web支持全栈式 Web 开发,包括 Tomcat 和 spring-webmvc。spring-boot-starter-websocket支持 WebSocket 开发。spring-boot-starter-ws支持 Spring Web Services。spring-boot-starter-actuator增加了面向产品上线相关的功能,比如测量和监控。spring-boot-starter-remote-shell增加了远程 ssh shell 的支持。spring-boot-starter-jetty引入了 Jetty HTTP 引擎(用于替换 Tomcat)。spring-boot-starter-log4j支持 Log4J 日志框架。spring-boot-starter-logging引入了 Spring Boot 默认的日志框架 Logback。spring-boot-starter-tomcat引入了 Spring Boot 默认的 HTTP 引擎 Tomcat。spring-boot-starter-undertow引入了 Undertow HTTP 引擎(用于替换 tomcat)